15,853
About 60% of people experience website promotion problems because their robots.txt file is not properly optimized. Therefore, you should not invest all the resources in SEO, link building, and advertisements right after the launch of your website. An unoptimized robots.txt file brings the potential to fatal outcomes up to the complete loss of traffic and customers. However, you can avoid that by optimizing your site’s indexing. Anyone can do it – you do not have to be a technical expert or programmer.
You can check the quality of page optimization using a free browser extension SiteAnalyzer SEO Tools.
What is a robots.txt file?
Robots.txt is a simple text file with instructions for search engines (Google, Yandex, etc.), which defines how their bots scan and index your site. Each search engine bot (crawler) downloads the latest version of a site’s robots.txt, i.e., updates the cached contents of the file. When visiting the URLs on the website, the crawler only indexes the allowed pages as stated in this file.
User-agent: * Sitemap: https://somesite.com/sitemap.xml |
Each crawler has a crawl budget, which determines how many pages can be scanned at once. This number varies from site to site depending on their size and popularity. The more popular the website and the more pages it has, the more often robots will crawl it and the faster this data will appear in search results. For example, search bots constantly crawl content looking for the new information on large news sites – that is how the search engine is able to show the breaking news just a few seconds after they are published.
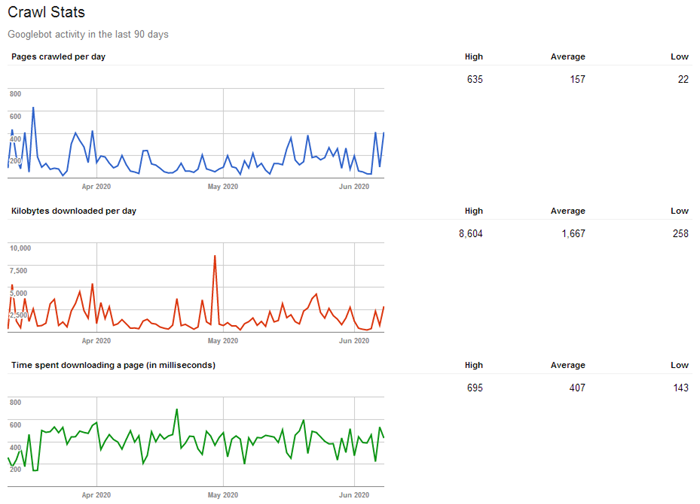
Thus, given the limited crawl budget, you should make the search bots crawl the most important, useful, and relevant pages first. They will be updated and appear in the search engine index more quickly. All the other information on your site that is not necessary and has not been updated for a long time can be hidden away. This way you will avoid wasting the craw budget on the content that does not have value.
Conclusion: You should disable crawling for some of your pages to optimize the site indexing. Stop crawlers from scanning duplicate pages, the local search results, personal pages, shopping carts, comparisons, sorting and filters, user profiles, wish lists, and other pages that are useless for an average user.
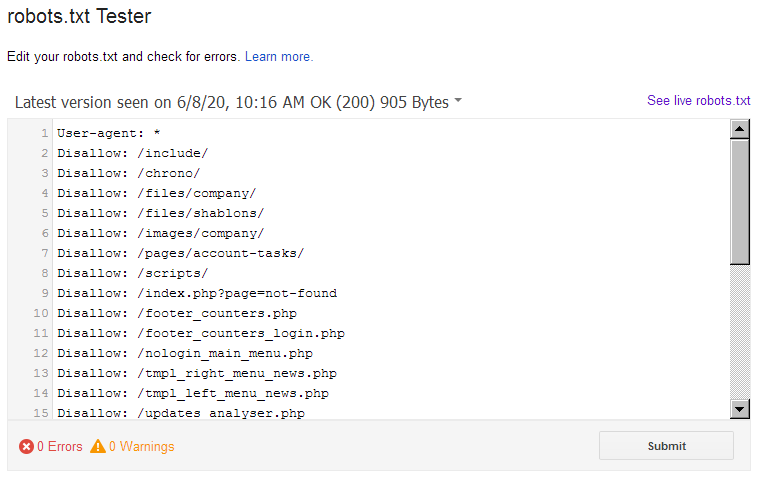
How to find and see the contents of a robots.txt file?
The file is located in the root of the domain at somesite.com/robots.txt.
This method is simple and works for all web resources that have a robots.txt file. It is openly accessible, so you can check the files on other sites to find out how are they set up. You only need to add "/robots.txt" at the end of the address bar of any domain. As a result, you will get one of these two options:
- A new page with the contents of the site’s robots.txt.
- A 404 error page (the page not found).
Conclusion: If you get a 404 error when trying to reach the /robots.txt page, you must fix the problem (create, set up, and upload it to your server).
How to create and configure your robots.txt file
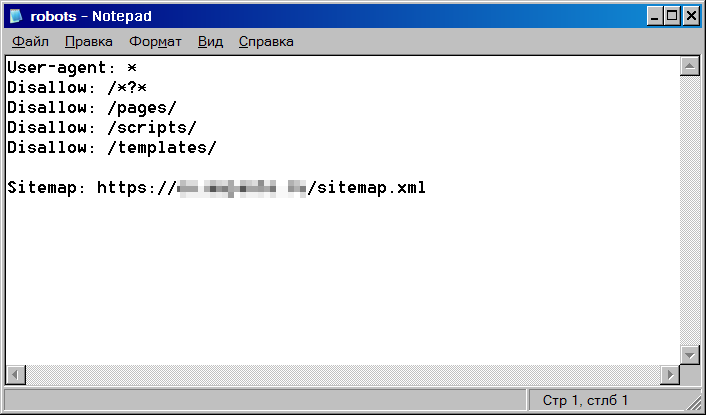
- You will need to create a new robots.txt file if you do not have one yet. Open a simple text editor such as Notepad (Windows) or TextEdit (Mac). Do not use MS Word since you need to create just a simple text file.
- If you already have this file, look it up in the root directory of your website. You can access it using an FTP client such as Total Commander, which is free. Copy the file to your PC’s hard drive and open it with Notepad.
Notes:
- If your website utilizes a CMS such as WordPress, you will not be able to find your robots.txt file in the root directory by default. Therefore, you will need to create a new file to edit the preferences.
- The file name is case sensitive! The name robots.txt must include the lower case letters only. Make sure you are typing the right filename. It is neither "Robots" no "robot" – these are the most common mistakes people make when creating the file.
The syntax and structure of a robots.txt file
Here are the standard directives used to allow or disallow the indexing of a site’s specific pages and directories:
User-agent: *
Disallow: /
In this example, search robots are not allowed to index the site (the Disallow directive followed by a colon, space, and a slash indicates the site root while the directive itself blocks something specified after the colon). An asterisk indicates that this section is open to all User-agents (each search engine has its own user agent. For instance, Google has Googlebot and Yandex has Yandex).
Now, let us examine the following strings:
User-agent: Googlebot
Disallow:
It means that Google’s web crawlers are allowed to index the entire site. However, there are no directives for other search engines. If no disallow directives are used, any other search engine is also allowed to index your site by default.
The below example will block a specific page of a site’s directory from being indexed:
User-agent: *
Disallow: /profile/$
This directive blocks the /profile/ directory from being indexed but allows to index all of its subdirectories and other pages:
- /profile/logo.png
- /profile/users/
- /profile/all.html
Here is yet another example:
# the directives for Yandex
User-agent: Yandex
Disallow: /profile/
Yandex crawlers are not allowed to index user personal profiles (the somesite.com/profile/ directory). They can scan everything else. At the same time, other search engine bots (such as Googlebot) can index every single page of the website.
As you might have already guessed, the number sign “#” is used to make comments.
User-agent directive
This is a required field used to specify which search engine bots should obey the specific rules. An asterisk symbol (*) means that these directives are applied to all crawlers from all search engines. Instead of this symbol, you can use the name of a specific crawler.
User-agent: * # specifies what search engine systems should obey these rules
This directive will be active until the next instruction for another User-agent (if it has specific rules) in the robots.txt file.
User-agent: Googlebot # these directives are only active for Google’s site crawlers
Disallow: /

User-agent: Yandex # for Yandex SE
Disallow:
Disallow directive
As written above, this directive blocks pages and directives on your website from being indexed according to the specified parameters.
User-agent: *
Disallow: /profile/ # blocks the user profiles from being indexed
The below example blocks the PDF, MS Word, and MS Excel files from being indexed:
User-agent: *
Disallow: *.pdf
Disallow: *.doc*
Disallow: *.xls*
The asterisk symbol in this case is used as a wildcard character, which represents any set of characters. It means that crawlers will not index files of the following formats: pdf, doc, xls, docx, xlsx.
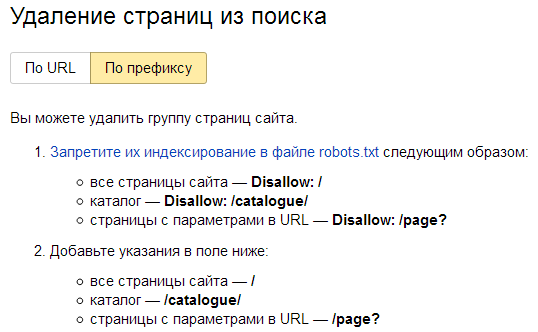
Note: You can use Yandex Webmaster to speed up the process of removing URLs on your website from the index: Remove URL. Go to the Tools section of a specific site and select the Prefix mode for bulk removal of indexed pages and directories.
Allow, Sitemap, Clean-param, Crawl-delay, and other directives
Additional directives listed below are used to fine-tune the robots.txt file.
Allow
The opposite to Disallow, Allow can be used to specify exceptions to a disallow rule.
You can allow the indexing of specific folders and files from the directories blocked with the Disallow directive:
User-agent: *
Disallow: /upload/
Allow: /upload/iblock
Allow: /upload/medialibrary
In the below example, Yandex is allowed to index the entire site while the other search engines are disallowed to do so pages.
User-agent: Yandex
Allow: /

User-agent: *
Disallow: /
Sitemap.xml
This file is used to specify the list of the most important pages on the site. The sitemap is generated in XML format specifically for search engine bots. The sitemap.xml file indicates the pages that need to be indexed so it must only include the important pages that return 200 response code. No duplicate content, sorting, and paginations!
By default, the sitemap.xml file is located in the root directory of a site. Nevertheless, you can upload it in any other directory provided that you specified the correct path to the file:
User-agent: Yandex
Disallow: /comments/
Sitemap: https://smesite.com/sitemap.xml
Large websites might have several sitemaps at once. For instance, Google allows you to reference up to 1000 sitemaps. However, one is enough for most websites. The file must meet the following requirements:
- The sitemap.xml file must be no larger than 50 MB without compressing;
- Each sitemap.xml file can contain up to 50,000 URLs.
If your file exceeds the specified size of 50 megabytes or contains more than 50,000 URLs, then you will have to split the list into several Sitemaps and use the index file to indicate the paths to all of them.
Example:
User-agent: Yandex
Allow: /

Sitemap: https://project.com/my_sitemap_index.xml
Sitemap: https://project.com/my_sitemap_1.xml
Sitemap: https://project.com/my_sitemap_2.xml
...
Sitemap: https://project.com/my_sitemap_X.xml
Note: The Sitemap directive is intersectional, meaning it can be used regardless of its location in robots.txt. However, it is usually listed in the last string of the file.
Clean-param
The Clean-param directive can be used if the site page URLs contain dynamic parameters that do not affect their contents. These parameters will not be indexed. Thus, a search engine bot will not reload duplicate information, which improves the site’s indexing efficiency.
For instance, «Clean-param: highlight /forum/showthread.php» converts the URL «/forum/showthread.php?t=30146&highlight=chart» to «/forum/showthread.php?t=30146». This way, you avoid creating a forum page duplicate with the highlighted text.
User-Agent: *
Clean-param: p /forum/showthread.php
Clean-param: highlight /forum/showthread.php
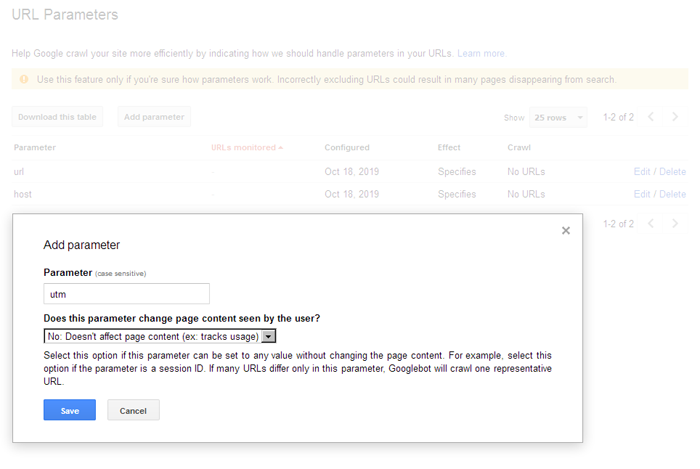
Clean-param is only used by Yandex. Google uses the URL settings in Google Search Console. You can easily add the required parameters in the webmaster’s interface:
Crawl-delay
This directive is used by Yandex. It sets the speed at which robots scan the site pages. It can be useful if you have a cheap website hosting and search robots cause high server load. In this case, you can make them scan your website less often by manually choosing the intervals.
For instance, Crawl-delay: 10 – this way you make the crawler wait every 10 seconds between each request. 0.5 is a half‐second delay.
User-Agent: *
Crawl-delay: 10
# Crawl-delay: 0.5
Robots.txt for WordPress
The below example shows the robots.txt file for a WordPress website. By default, WordPress has three main directories:
- /wp-admin/
- /wp-content/
- /wp-includes/
The /wp-content/ directory contains the «uploads» subdirectory, which is usually used to store media files. You should not completely block this main directory:
User-agent: *
Disallow: /wp-admin/
Disallow: /wp-includes/
Disallow: /wp-content/
Allow: /wp-content/uploads/
This parameter blocks the specific directories but allows crawling the «uploads» subdirectory located in the «wp-content» directory.
How to set up robots.txt for Google and Yandex
You should set up directives for each search engine separately (at least for Google and Yandex). Feel free to use the asterisk symbol (*) for other search engines.
User-agent: *
User-agent: Yandex
User-agent: Googlebot
Robots.txt configuration for Google
The robots.txt file is easy to configure, but there are some nuances:
User-agent: Googlebot
Disallow: /search
Disallow: /profile
Disallow: */feed
Allow: *.css
Allow: *.js
Important: You need to allow the indexing of CSS and JS files for Google. They are important for this search engine since it is capable of rendering JavaScript. Therefore, it can get additional information out of it that might be useful for the website or can simply clarify the purpose of the specific scripts.
Visit this link to open Google Webmaster Tools and make sure your robots.txt file is correct.
Robots.txt configuration for Yandex
You might see the outdated Host directive in some robots.txt files. It was used to specify the main version of the site (mirror). This directive is outdated, so you do not have to use it. The search engine uses 301 redirects to identify the site’s main mirror:
User-agent: Yandex
Disallow: /search
Disallow: /profile
Disallow: */feed
Host: https://project.com # optional
Use the free Yandex tool to automatically check whether your robots.txt file is correct.
Block search indexing with Noindex and X-RobotsTag
In some cases, the Google search engine might index pages that were blocked from being indexed in the robots.txt file. For instance, it might happen if there are many external links to the page and it contains useful information.
Here is an excerpt from Google Search Console Help:
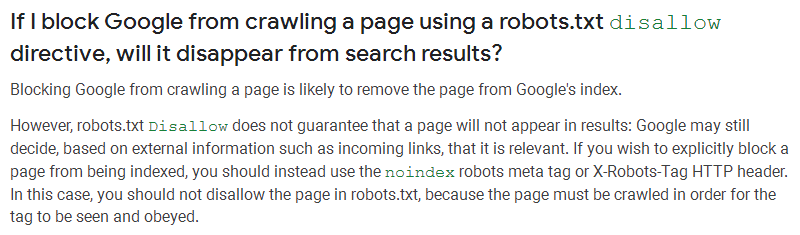
Use the NOINDEX meta if you want to be 100% sure the specific pages are blocked from being indexed.
Noindex – is a meta tag, which tells the search engine not to index a page. Unlike the robots.txt file, it is a sure way to prevent crawlers from indexing a page, which makes it a great option to hide the confidential information:
- <meta name="robots" content="noindex">
If you only want to hide the page from Google, use the following parameter:
- <meta name="googlebot" content="noindex">
X-Robots-Tag
X-Robots-Tag allows managing the indexing process of a page using the HTTP header response. This tag is similar to the meta robots tag. It prevents crawlers from scanning the specific types of content such as images. The bot does not even need to download it, which allows saving up the crawl budget.
To set up X-Robots-Tag, you need to have access to your site's .php and .htaccess files, as well as possess the basic programming skills. The meta robots tag directives apply to X-Robots-Tag.
<?
  header("X-Robots-Tag: noindex, nofollow");
?>
Note: X-Robots-Tag is especially effective if you want to prevent your images and media files from scanning. If you want to block other content from being indexed, you should better use meta tags. Search engine bots strictly follow the Noindex and X-Robots Tag directives in contrast to the robots.txt file, which is only used as a recommendation.
How to quickly create a robots.txt file for a new site from a scratch?
It is very easy. Download it from your competitor!

Just visit any website and add "/robots.txt" to the address bar. This allows you to check the file used by your competitor. However, you should not just carelessly copy its content to your file since the directives for another site might negatively affect the indexing of your web-resource. That is why you need to understand at least the basic operating principles of robots.txt to avoid blocking the important directives.
Most importantly: after making changes, check the robots.txt file for validity (compliance with the rules). This way you definitely will not need to worry about the indexing of your site.
Other examples of robots.txt configuration
User-agent: Googlebot
Disallow: /*?* # blocks all the pages with parameters from being indexed
Disallow: /users/*/photo/ # blocks all the pages with the URLs such as "/users/big/photo/", "/users/small/photo/" from being indexed
Disallow: /promo* # blocks all the pages with the URLs such as "/promo-1", "/promo-site/" from being indexed
Disallow: /templates/ # block the site’s templates from being indexed
Disallow: /*?print= # blocks the “print” versions of pages from being indexed
Disallow: /*&print=
Prevent the Majestic, Ahrefs, and Yahoo! analytics services from scanning your site:
User-agent: MJ12bot
Disallow: /

User-agent: AhrefsBot
Disallow: /

User-agent: Slurp
Disallow: /
The robots.txt file configuration for Opencart:
User-agent: *
Disallow: /*route=account/
Disallow: /*route=affiliate/
Disallow: /*route=checkout/
Disallow: /*route=product/search
Disallow: /index.php?route=product/product*&manufacturer_id=
Disallow: /admin
Disallow: /catalog
Disallow: /download
Disallow: /registration
Disallow: /system
Disallow: /*?sort=
Disallow: /*&sort=
Disallow: /*?order=
Disallow: /*&order=
Disallow: /*?limit=
Disallow: /*&limit=
Disallow: /*?filter_name=
Disallow: /*&filter_name=
Disallow: /*?filter_sub_category=
Disallow: /*&filter_sub_category=
Disallow: /*?filter_description=
Disallow: /*&filter_description=
Disallow: /*?tracking=
Disallow: /*&tracking=
Allow: /catalog/view/theme/default/stylesheet/stylesheet.css
Allow: /catalog/view/theme/default/css/main.css
Allow: /catalog/view/javascript/font-awesome/css/font-awesome.min.css
Allow: /catalog/view/javascript/jquery/owl-carousel/owl.carousel.css
Allow: /catalog/view/javascript/jquery/owl-carousel/owl.carousel.min.js

Author Andrey Simagin
Over 15 years of experience in SEO and marketing. Primary areas of expertise: development of software, tools, and web services for SEO (SiteAnalyzer, SEO Tools, SERPRiver). Website promotion services in Yandex... →
Other articles: